
Cactus Cuties Birthday Card w/tutorial Video

If you've been following my blog for awhile, you've probably noticed that I've not posted as often in the last month. Life has been super busy with many other obligations and my creative mojo has just been on a hiatus! Therefore, I'd taken a bit of a break from posting and videoing. Hoping that I'm back.

I participated in a swap with other demonstrators this month, so I would have to push my creative juices a bit. 

This card is what came from that:


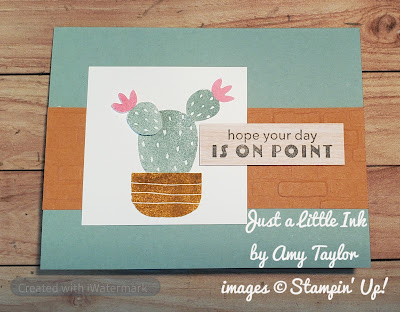
I knew when I saw the January-June Mini Catalog that I wanted this bundle. There's just something I love about cactus. This photopolymer stamp set with coordinating builder punch has so many design possibilities. This is just the beginning.

Here are the measurements:

Soft Succulent cardstock: (base) 5-1/2" x 8-1/2" and scored along the 8-1/2" side at 4-1/4"

Cinnamon Cider: 1-3/4" x 5-1/2" and textured using the Brick & Mortar 3D Embossing Folder

Basic White: 4" x 5-1/4" (inside); 2-3/4" x 2-3/4" (front cactus layer); 3-1/4" x 2-1/4"  or assorted scraps (for stamping & punching cactus)

In Good Taste Designer Series Paper: 3/4" x 2-1/2" (for stamped greeting)

Here is the video tutorial:


Thanks for subscribing, liking and sharing!

Product List
Cactus Cuties Bundle
$31.50
Brick & Mortar 3D Embossing Folder
$10.00
Stampin' Cut & Emboss Machine
$120.00
Soft Succulent 8 1/2" X 11" Cardstock
$8.75
Soft Succulent Classic Stampin' Pad
$7.50
Cinnamon Cider 8-1/2" X 11" Cardstock
$8.75
Cinnamon Cider Classic Stampin' Pad
$7.50
Basic White 8 1/2" X 11" Cardstock
$9.75
In Good Taste Designer Series Paper
$21.00
Polished Pink Classic Stampin' Pad
$7.50
Tuxedo Black Memento Ink Pad
$6.00
Mini Stampin' Dimensionals
$4.00
Stampin' Dimensionals
$4.00
Special Moments Photopolymer Stamp Set (English)
$0.00
Stampin' Seal
$8.00
Bone Folder
$7.00

Comments

Popular posts from this blog

2011 Desktop Calendar

This month in my stamp club meetings, I had the gals make these desktop calendars. It was a big hit. The image to the left of the calendar can be changed according to the season (winter, spring, summer & fall) by removing the image and placing one of the other 3 onto the velcro dot (attached behind the image). The corresponding side of the velcro dot is placed on the back side of the images. I used the stamp set A Flower for all Seasons , #111592, $14.95. And, the extra images are stored inside in a small cellophane bag. The calendar base takes only 1 sheet of card stock to make, measuring 9" x 6-1/2". With simple scoring and folding, it goes together very quickly. Another demonstrator had shared the calendar file that is printed onto printer paper and cut to size. All fit into the 1/2" library clip from the clips assortment (#112580; $6.95). There are 8 of them included in the package along with a couple of other style of paper clips. While they are still ...

Long Time No See Slimline Card

  This cute lama (and the adorable dachshund too) were on my 'must have' list when the last Online Exclusives were released. And, I finally found time to play with this easy to use stamp set. You can find the measurements and simple tips for creating this fun card by watching the video tutorial here: And, you can easily order from my Stampin' Up! Online Store by clicking on the images below. I'd love to be your demonstrator, if you don't already have one. And, each order receives a hand-stamped thank you card from me in the mail (as long as you opt in to receive communication from me, that is)! Print Recipe Product List 166189 $20.00 166182 $20.00 166632 $12.50 133679 $14.00 166780 $14.00 166780 $14.00 132708 $8.00 161678 $9.00 154886 $11.00 161680 $11.00 165288 $11.00 154893 $11.00 144608 $5.50 1634...

Sunflower 3D Embossing Folder Techniques

  Do you ever need a quick, but 'wow' kind of card? When don't you, would be my response! That was the inspiration for this weeks card and video tutorial. The Sunflower 3D Embossing Folder is part of the next round of Online Exclusive products that will be available for purchase beginning July 1st. This huge embossing folder creates an intricate and detailed 'image' perfect for simple to elaborate projects. Since I'm more of a simple project kind of gal, that's the direction I went with. Here are the measurements: Crumb Cake (card base) cardstock: 8 1/2" x 5 1/2", 2 1/2" x 3/4" Mossy Meadow (layer) cardstock: 5" x 3 3/4" Crushed Curry (focal) cardstock: 4 3/4" x 4") Here is the video tutorial where I share this technique and one more as well as share some additional color combinations at the end: As always, thank you for subscribing, liking, sharing and commenting! For ease of ordering, simply click on the photos below...